I’ve been struck..brought down..and there is NO time for that! What is one to do though? It all started about a week ago when Bubba started with “the cough”. He had no temperature and didn’t complain much, just rested a little more than usual (and who can complain about that, right?). Then…Stinky Face came next only she had a temperature and sounded awful. Hopeful that it would go away I waited two days! Then reluctantly we headed to the doctor’s office. There is where I learned that the flu and strep throat are known to keep company with each other (who knew). Of course I felt even worse that I let it go for two day before taking her. For obvious reasons both Bubba and I were also tested for strep and we both came back negative (so that is good). However, our week could not possibly be complete unless I too was sick, and so it was! As we come to the close of our week Bubba is sounding better, Stinky Face seems to be doing a little better, and I am still running a small temperature and feel as though I could cough up and internal organ any moment. Obviously there is no time for mommy’s to feel under the weather, especially when Girl Scout cookie booths start this weekend!! I am one of Silly Whim’s (8yrs) Brownie leaders and the next two weekends are jam packed with cookie booths, so I am hopeful this illness will be over soon! Since I have been under the weather I thought I would share what I recently finished up!
For Christmas this year I made handprint pillows for all the grandparents! I also started making one for myself, which I never did finish that is until recently. I used this tutorial and tweaked it a little. I used steam-a-seam and created iron on transfers with fabric. I also embroidered each child’s name and age along side of their handprint. Below is my pillow….I love it and hope the grandparents enjoyed theirs!
Now to come up with something for this year…ideas welcome!
Friday, February 25, 2011
Tuesday, February 22, 2011
An attempt at organization
I am always looking for ways to organize and keep order in our house, who isn’t right? My husband would probably say a fail miserably at this job, but it’s not for the lack of trying! I am always forgetting things I need to pick up when I am out even though I make lists, which always seem to get left laying somewhere on my way out the door! Recently my 16yr old has called one too many times from school asking me to bring her homework (that she forgot). Needless to say I finally got fed up and told her I will no longer bring her homework or other forgotten items to school. My most recent project was something I am hoping will help with some of our current struggles. It all started with an idea, and then I set out to find a smallish white board. Of course I looked at goodwill first, however my gold mine this time was Target that’s right the good ole trusty end caps. I picked up this fantastic little white board for $1.98!! Below is what I ended up with.
I wasn’t extremely excited about the plainness of this white board so I decided to try and make it my own.
For starters I taped off the white board exposing only the frame.
Next I used some spray paint for plastics that I happen to have on hand and sprayed the frame. I did a couple coats to get a good covering.
Warning: Be careful NOT to do THIS!
After your paint has dried you can remove the tape and place the pen back on the board.
Next I found some scrap fabric and created several flowers each a little different. First I cut a strip of fabric and folded it in half and ironed it. Next I went over to my machine and ran a long stitch down the side not folded and pushed the fabric together creating a ruffle. See below:
Next I rolled the ruffle up to form a flower. Once it looked just how I wanted it I hand stitched the back/bottom of the flower to keep it together and then glued a small piece of felt over it. I then folded the flower down a bit to create this look:
For the next flower I cut another strip just as above, however this time I twisted my fabric and rolled into a flower. Once I got the desired look I hot glued the flower to stay, and then placed a small felt circle on the bottom with hot glue. I also did a felt flower this same way without folding in half. The felt flowers still seemed a little naked, so I plopped some little pearls in the center (love it)! These are what my final flowers looked like.
Next position your flowers in an arrangement on your board which make you happy! Once you get the look you desire then hot glue your flowers in place.
Now using those handy dandy command hooks adhere them to the locations you want to place your board. For me this was the front door, now hang and put that bad boy to use!
Now there should be no reason you or anyone for that matter to forget stuff anymore (we can all wish right?). Plus think of all those loving messages you can now leave for your family! Not to mention reminders such as trash day for those who have lived here for 9 years and still can’t remember when trash day is *smiles*.
Check out the linky parties in my side bar I will be linking up to some!
Happy Blogging!
Thursday, February 17, 2011
Playroom meets Formal Living Room
Hellllloooo….Blog land! I’ve been planning on doing some furniture makeovers for a while. Being as I have NEVER done this I must admit I am a little scared. To prepare for larger projects I found something at Goodwill, of course, that we needed but it didn’t necessarily go with the area we needed it for. Exhibit A:
While this would look great in a child’s room or playroom it just did not go with the area I wanted to put it in. While in Goodwill I tugged on the parts to ensure the pencil’s eraser was removable. I had something in mind, to replace it with. So, a trip to Lowes I found a decorative top to replace the eraser top. Exhibit B:
Next I wiped down the entire rack, then disassembled it like so:
I proceeded to coat all the pieces with primer. I used a low odor primer. I put 2 coats of primer on all pieces; it just seemed to cover better that way. So at this point it should look like this:
Next I painted all pieces with one coat of acrylic burnt umber. The coverage wasn’t great, but I figured since I was going to an aged/distressed/shabby chic look that was okay. So, at this point this is what it looks like:
Now moving into the final stages for my top coat I used an acrylic butter cream color mixed ½ and ½ with a faux glaze. With this mixture I painted then went behind and used a damp paper towel and rubbed some off. The first coat I did the outcome wasn’t what I wanted, so I went over each piece again with the mixture and rubbed again. This outcome was more what I was looking for. Remember this is my first project! I may at some point soon do some type of spray paint sealant. So below is what the pieces look like upon completion:
Completely assembled:
Placed in the formal living room and in use*smiles*:
My husband would love it if I would just have one coat for each person, but my fellow mothers have to help me out here. You just can’t have one coat! There are winter coats, spring jackets, dance jackets, and rain jackets! When you have six family members that is a lot of outerwear. I have to add I think we have the smallest coat closet EVER! So, with that said I’m happy with the little project. Before I tackle larger projects I think I will try a couple smaller in expensive ones. If you have done furniture and have any advice to give please do so in my comments, I can definitely use all the help I can get!
Happy Blogging!
Linking up with: Thursday and Friday linkies check them out in my side bar!
Wednesday, February 16, 2011
Tuesday, February 15, 2011
A gift for the Hubster
I know Valentine's Day is now officially, however I was unable to finish Hubby’s gift until just moments before Valentine’s Day was over last night. Isn’t it sad when your children’s valentines come before your significant other? We decided a long time ago we were not going to buy cards for any occasion that homemade cards are better all the way around and personally I think they mean more that way! That and I love seeing my hubby get creative, who does like seeing a man get in touch with his inner child. *smile* So, this brings me to last night after the kids went to bed I had known what I wanted to make for him, which was just something simple(this is me we are talking about). I will apologize now as I wanted to do little tutorial w/pictures to go along with this, however my camera battery died and I had to go on without it. Since I’m a simple person my project was also simple, so I will do my best just to tell you how I made this.
Materials Needed:
2 pcs of 12X12 fabric
1 pc white 6x6 fabric
1 pc coordinating 6x6 fabric
1 pcs 6x6 steam a seam
1 iron on paper
Coordinating ribbon
Matching thread
1. Once all cut pieces are gathered together take your piece of 6x6 steam a seam and fold in half and cut a heart shape from the center. Then remove one side of the paper and adhere your heart to your 6x6 coordinating fabric and cut around the heart. You should now have a heart iron on.
2. Adhere (iron) your heart onto your 6x6 white fabric.
3. Take your white 6x6 fabric and fold under your 6x6 square to give it a nice finish edge, this is to prepare it to be sewn onto your 12x12 fabric.
4. Print your subway art onto your iron on paper. Then take your prepared 6x6 white fabric with the heart iron on and position your iron on centered over the fabric. Iron on then let cool before attempting to remove from fabric. I found my particular iron on material sealed my heart behind the iron on.
5. Take one piece of your 12 x 12 material and center your 6x6 prepared white fabric w/heart and iron on and pin it on. Next sew this on.
6. Cut two strips of ribbon 12 inches long, and then pin the ribbon down on each side of your 6x6 white fabric square. Sew both ribbons down on each side of the ribbon, so the ribbon is secure on both the left and right side of the ribbon.
7. Next place you’re two 12x12 pieces of fabric wrong sides together, pin and sew. Remember to leave a section at the bottom of the pillow for stuffing.
8. Turn the pillow right side out, stuff, and use an invisible stitch to close the pillow.
9. Now lovingly present your pillow to your Hubby in my case I had just minutes to spare before Valentine’s Day was officially over *smile*
On a side not this does not have to be just for Valentine’s Day, this would also make a great gift for an Anniversary!
Check back later this week for a small piece of furniture I refinished tutorial.
Happy Blogging!
Monday, February 14, 2011
Hearts for my Sweethearts!
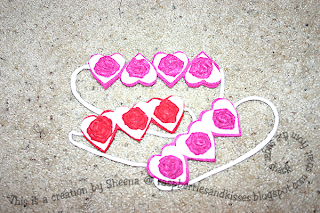
Happy Valentine’s Day Blogland!! What a special little sweet day! We’ve actually been working on valentines for a while now since Bubby had to write his name on all of his and he could only do a few at a time. So, this is a much anticipated day! I always like to put together little bags with something special for the kids for Valentine’s Day. My oldest Lolli (16) received a silver mother/daughter ring, heart headband, and conversation jelly beans. My Silly Whim (8) received an outfit to wear today, small dangly silver heart earrings, wizard of Waverly place calendar (on sale at Boarders for $1.00 WOW), and conversation jelly beans, Bubby (4) received a Redskins Jersey, a book “How big is GOD” (love this book! Just a little background Bubby has been really asking a lot here lately where God is and when I tell him he is everywhere it’s a little hard for him to grasp that concept. This book puts it very nicely!), and conversation jelly beans. Stinky Face (1) received a v-day book and heart headband. I really tried to keep it low on sugar since they really don’t need it. Why it is holidays are always centered around candy? I mean really Valentine’s Day, Easter, and Halloween?? Oh well I suppose that is another post in its own. I made the Felt heart headbands for Lolli and Stinky Face and I thought they turned out so cute, so I wanted to share how I made them.
Supplies Needed:
Felt (whatever colors you desire)
Sewing machine (or needle and thread if hand sewing)
Hot glue gun
Old t-shirt to coordinate with your colors for the band
Here is the pattern I created; there are two different styles to choose from. Download, print, cut out, and what you have should look like this:
Next I cut out the long felt heart string and the single hearts to look like so:
Next I took one of Bubby’s old white under t-shirts and cut a small (1/2 inch) strip, then I cut that in half and stretched it a little to make the side curl in a little. Make sure to measure for the size you need. Remember t-shirt material is very stretchy keep that in mind when sizing! The first one I made Stinky Face could was a little too big and kept falling down. Below are some pictures of this process:
Then take on over to your machine or hand stitch the t-shirt strip onto the top of your string of hearts (so when looking at the top of this piece the strip would be on the underneath).
Next we are going to need to plug in our glue gun for the remainder of this project. Now you are going to glue your top heart string and bottom heart string together. Your white t-shirt strip should now be sandwiched between the felt and not seen! Then we are going to glue on each individual heart. At this point I shaped them some making them look just right to glue on. The four heart string went on without overlapping any, however the three heart string I firsts placed each end heart on first and then the middle heart on overlapping the two end hearts like so:
Next we are going to make little rosettes to go in the center of each heart. I started by cutting strips of felt. Then keeping a little tail on the end I twisted and wrapped the felt around for form the rosette. Like so:
Now you just glue on your rosettes making sure to adhere it well. Your finished headband should look like these. You can really do so much with these and what is great if you have a big headed little one like Stinky Face (love her) it does not squeeze the head at all!
Now adore your creation on your little one and marvel at how cute she is and how much you love her!
Happy Valentine’s Day!
Linking to:
Saturday, February 12, 2011
Mmmmmm…Cookies!
So, is it bad to let your kids eat cookies for breakfast? I signed up to supply sugar cookies for Bubba’s (4) Valentine’s Day Party at preschool. I wanted to make him proud so I searched the internet and came across this recipe. I made two batches of the dough, which was enough to send 20 to school and have a good amount at home. I even made the dough pink. Keep in mind here me + kitchen = mess. See below:
Pretty Pink dough:
Yummy..Pretty ..Cookies:
Side note I started out making these on my Pampered Chef cooking stone, however after the first batch switched to a metal baking sheet. The cookies turned out so much better on metal cookie sheet.
Since the recipe also came with an icing recipe I went ahead and gave that a try for our cookies at home, since they are decorating their class cookies in school! All I have to say is homemade sugar cookies + homemade icing + sugar sprinkles = YUMMY! Honestly homemade tastes so much better than store bought!
Plus the kids loved it…especially for breakfast. *smiles*
Added bonus I get to use those thrifty little cake plates I made last week!
Add some sugarlicous love to your Valentine’s Day with homemade cookies and icing!
Subscribe to:
Posts (Atom)